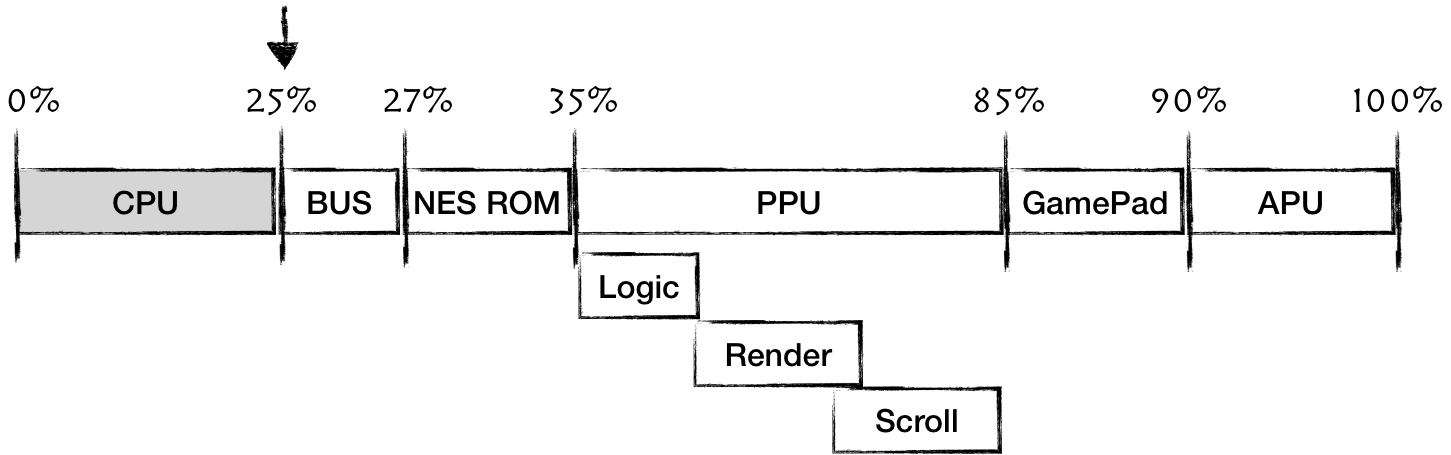
Running our first game
Great, you've made it this far. What we are going to do next is to take a bit of a detour. The snake game was introduced in this article: Easy 6502. In fact, it is not a true NES game. It is built with 6502 instructions and uses quite different memory mappings.
However, it's a fun way to validate that our CPU is truly functional, and it's fun to play the first game.
The majority of logic we are to implement now would be reused some way or another when we will be implementing rendering in PPU, so nothing is wasted effort.
The machine code of the game:
#![allow(unused)]

fn main() {
let game_code = vec![
    0x20, 0x06, 0x06, 0x20, 0x38, 0x06, 0x20, 0x0d, 0x06, 0x20, 0x2a, 0x06, 0x60, 0xa9, 0x02, 0x85,
    0x02, 0xa9, 0x04, 0x85, 0x03, 0xa9, 0x11, 0x85, 0x10, 0xa9, 0x10, 0x85, 0x12, 0xa9, 0x0f, 0x85,
    0x14, 0xa9, 0x04, 0x85, 0x11, 0x85, 0x13, 0x85, 0x15, 0x60, 0xa5, 0xfe, 0x85, 0x00, 0xa5, 0xfe,
    0x29, 0x03, 0x18, 0x69, 0x02, 0x85, 0x01, 0x60, 0x20, 0x4d, 0x06, 0x20, 0x8d, 0x06, 0x20, 0xc3,
    0x06, 0x20, 0x19, 0x07, 0x20, 0x20, 0x07, 0x20, 0x2d, 0x07, 0x4c, 0x38, 0x06, 0xa5, 0xff, 0xc9,
    0x77, 0xf0, 0x0d, 0xc9, 0x64, 0xf0, 0x14, 0xc9, 0x73, 0xf0, 0x1b, 0xc9, 0x61, 0xf0, 0x22, 0x60,
    0xa9, 0x04, 0x24, 0x02, 0xd0, 0x26, 0xa9, 0x01, 0x85, 0x02, 0x60, 0xa9, 0x08, 0x24, 0x02, 0xd0,
    0x1b, 0xa9, 0x02, 0x85, 0x02, 0x60, 0xa9, 0x01, 0x24, 0x02, 0xd0, 0x10, 0xa9, 0x04, 0x85, 0x02,
    0x60, 0xa9, 0x02, 0x24, 0x02, 0xd0, 0x05, 0xa9, 0x08, 0x85, 0x02, 0x60, 0x60, 0x20, 0x94, 0x06,
    0x20, 0xa8, 0x06, 0x60, 0xa5, 0x00, 0xc5, 0x10, 0xd0, 0x0d, 0xa5, 0x01, 0xc5, 0x11, 0xd0, 0x07,
    0xe6, 0x03, 0xe6, 0x03, 0x20, 0x2a, 0x06, 0x60, 0xa2, 0x02, 0xb5, 0x10, 0xc5, 0x10, 0xd0, 0x06,
    0xb5, 0x11, 0xc5, 0x11, 0xf0, 0x09, 0xe8, 0xe8, 0xe4, 0x03, 0xf0, 0x06, 0x4c, 0xaa, 0x06, 0x4c,
    0x35, 0x07, 0x60, 0xa6, 0x03, 0xca, 0x8a, 0xb5, 0x10, 0x95, 0x12, 0xca, 0x10, 0xf9, 0xa5, 0x02,
    0x4a, 0xb0, 0x09, 0x4a, 0xb0, 0x19, 0x4a, 0xb0, 0x1f, 0x4a, 0xb0, 0x2f, 0xa5, 0x10, 0x38, 0xe9,
    0x20, 0x85, 0x10, 0x90, 0x01, 0x60, 0xc6, 0x11, 0xa9, 0x01, 0xc5, 0x11, 0xf0, 0x28, 0x60, 0xe6,
    0x10, 0xa9, 0x1f, 0x24, 0x10, 0xf0, 0x1f, 0x60, 0xa5, 0x10, 0x18, 0x69, 0x20, 0x85, 0x10, 0xb0,
    0x01, 0x60, 0xe6, 0x11, 0xa9, 0x06, 0xc5, 0x11, 0xf0, 0x0c, 0x60, 0xc6, 0x10, 0xa5, 0x10, 0x29,
    0x1f, 0xc9, 0x1f, 0xf0, 0x01, 0x60, 0x4c, 0x35, 0x07, 0xa0, 0x00, 0xa5, 0xfe, 0x91, 0x00, 0x60,
    0xa6, 0x03, 0xa9, 0x00, 0x81, 0x10, 0xa2, 0x00, 0xa9, 0x01, 0x81, 0x10, 0x60, 0xa2, 0x00, 0xea,
    0xea, 0xca, 0xd0, 0xfb, 0x60
];

}
You can find assembly code with comments here.
The memory mapping that the game uses:
| Address space | Type | Description |
|---|---|---|
| 0xFE | Input | Random Number Generator |
| 0xFF | Input | A code of the last pressed Button |
| [0x0200..0x0600] | Output | Screen. Each cell represents the color of a pixel in a 32x32 matrix. The matrix starts from top left corner, i.e. 0x0200 - the color of (0,0) pixel 0x0201 - (1,0) 0x0220 - (0,1) 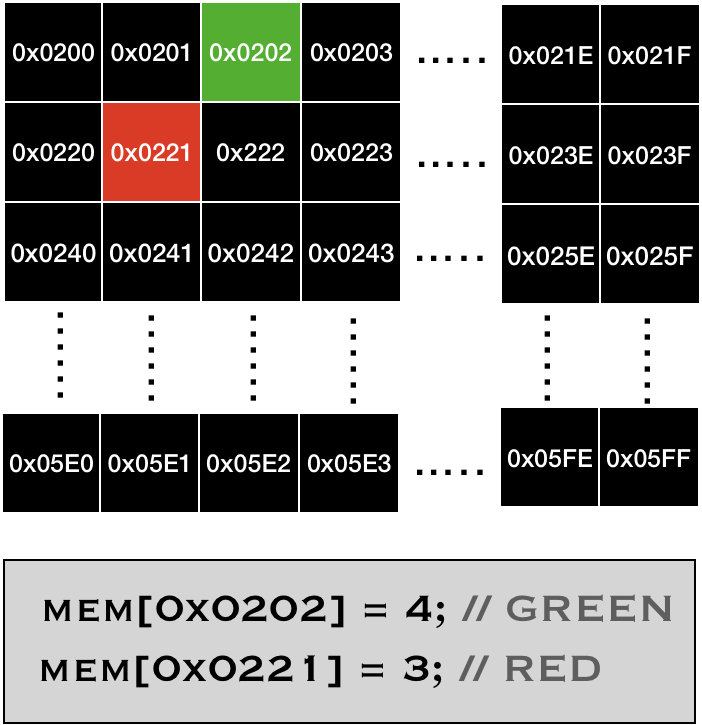 |
| [0x0600...] | Game code | Execution code |
Important note: the game expects that the execution code would be located right after the output region. This means that we need to update our CPU.load function:
#![allow(unused)]
fn main() {
impl CPU {
    // ...
    pub fn load(&mut self, program: Vec<u8>) {
        self.memory[0x0600..(0x0600 + game_code.len())].copy_from_slice(&program[..]);
        self.mem_write_u16(0xFFFC, 0x0600);
    }

}
}
The game executes standard game loop:
- read input from a user
- compute game state
- render game state to a screen
- repeat
We need to intercept this cycle to get user input into the input mapping space and render the state of the screen. Let's modify our CPU run cycle:
#![allow(unused)]
fn main() {
impl CPU {
 // ...
    pub fn run(&mut self) {
        self.run_with_callback(|_| {});
    }

    pub fn run_with_callback<F>(&mut self, mut callback: F)
    where
        F: FnMut(&mut CPU),
    {
        let ref opcodes: HashMap<u8, &'static opcodes::OpCode> = *opcodes::OPCODES_MAP;

        loop {
            callback(self);
            //....
            match code {
                //...
            }
            // ..
        }
    }
}
}
Now, the client code can provide a callback that will be executed before every opcode interpretation cycle.
The sketch of the main method:
fn main() {
   let game_code = vec![
// ...
   ];

   //load the game
   let mut cpu = CPU::new();
   cpu.load(game_code);
   cpu.reset();

   // run the game cycle
   cpu.run_with_callback(move |cpu| {
       // TODO:
       // read user input and write it to mem[0xFF]
       // update mem[0xFE] with new Random Number
       // read mem mapped screen state
       // render screen state
   });
}
For our input/output, we would be using a cross-platform library that's popular in game development, the Simple DirectMedia Layer library.
Luckily for us, there is a convenient crate that provides Rust bindings for the library: rust-sdl2
-
Depending on your Operating System you need to install SDL2.0 development libraries
-
Now let's add rust-sdl2 crate to Cargo.toml:
# ...

[dependencies]
lazy_static = "1.4.0"
bitflags = "1.2.1"

sdl2 = "0.34.0"
rand = "=0.7.3"
- In code, we need to initialize SDL:
use sdl2::event::Event;
use sdl2::EventPump;
use sdl2::keyboard::Keycode;
use sdl2::pixels::Color;
use sdl2::pixels::PixelFormatEnum;

fn main() {
   // init sdl2
   let sdl_context = sdl2::init().unwrap();
   let video_subsystem = sdl_context.video().unwrap();
   let window = video_subsystem
       .window("Snake game", (32.0 * 10.0) as u32, (32.0 * 10.0) as u32)
       .position_centered()
       .build().unwrap();

   let mut canvas = window.into_canvas().present_vsync().build().unwrap();
   let mut event_pump = sdl_context.event_pump().unwrap();
   canvas.set_scale(10.0, 10.0).unwrap();

   //...
}
Because our game screen is tiny (32x32 pixels), we set the scale factor to 10.
Using
.unwrap()is justifiable here because it's the outer layer of our application. There are no other layers that potentially can handle Err values and do something about it.
Next, we will create a texture that would be used for rendering:
#![allow(unused)]
fn main() {
//...
   let creator = canvas.texture_creator();
   let mut texture = creator
       .create_texture_target(PixelFormatEnum::RGB24, 32, 32).unwrap();
//...
}
We are telling SDL that our texture has a size of 32x32, and that each pixel is to be represented by 3 bytes (for R, G and B colors). This means that the texture will be represented by a 32x32x3 array of bytes.
- Handling user input is straightforward:
#![allow(unused)]
fn main() {
fn handle_user_input(cpu: &mut CPU, event_pump: &mut EventPump) {
   for event in event_pump.poll_iter() {
       match event {
           Event::Quit { .. } | Event::KeyDown { keycode: Some(Keycode::Escape), .. } => {
               std::process::exit(0)
           },
           Event::KeyDown { keycode: Some(Keycode::W), .. } => {
               cpu.mem_write(0xff, 0x77);
           },
           Event::KeyDown { keycode: Some(Keycode::S), .. } => {
               cpu.mem_write(0xff, 0x73);
           },
           Event::KeyDown { keycode: Some(Keycode::A), .. } => {
               cpu.mem_write(0xff, 0x61);
           },
           Event::KeyDown { keycode: Some(Keycode::D), .. } => {
               cpu.mem_write(0xff, 0x64);
           }
           _ => {/* do nothing */}
       }
   }
}
}
- Rendering the screen state is a bit trickier.
Our program assumes 1 byte per pixel, while SDL expects 3 bytes.
From the game point of view it doesn't matter much how we map colors, the only two color maps that are essential are:
- 0 - Black
- 1 - White
#![allow(unused)]
fn main() {
fn color(byte: u8) -> Color {
   match byte {
       0 => sdl2::pixels::Color::BLACK,
       1 => sdl2::pixels::Color::WHITE,
       2 | 9 => sdl2::pixels::Color::GREY,
       3 | 10 => sdl2::pixels::Color::RED,
       4 | 11 => sdl2::pixels::Color::GREEN,
       5 | 12 => sdl2::pixels::Color::BLUE,
       6 | 13 => sdl2::pixels::Color::MAGENTA,
       7 | 14 => sdl2::pixels::Color::YELLOW,
       _ => sdl2::pixels::Color::CYAN,
   }
}
}
Now we can transform the CPU screen map into 3 bytes like this:
#![allow(unused)]
fn main() {
    let color_idx = cpu.mem_read(i as u16);
    let (b1, b2, b3) = color(color_idx).rgb();
}
A caveat with this is that we don't want to force updating the SDL canvas if the screen state hasn't changed. Remember that the CPU will call our callback after each instruction, and most of the time those instructions have nothing to do with the screen. Meanwhile, updating the canvas is a heavy operation.
We can keep track of the screen state by creating a temp buffer that will be populated from the screen state. Only in the case of screen changes, we would update SDL canvas.
#![allow(unused)]
fn main() {
fn read_screen_state(cpu: &CPU, frame: &mut [u8; 32 * 3 * 32]) -> bool {
   let mut frame_idx = 0;
   let mut update = false;
   for i in 0x0200..0x600 {
       let color_idx = cpu.mem_read(i as u16);
       let (b1, b2, b3) = color(color_idx).rgb();
       if frame[frame_idx] != b1 || frame[frame_idx + 1] != b2 || frame[frame_idx + 2] != b3 {
           frame[frame_idx] = b1;
           frame[frame_idx + 1] = b2;
           frame[frame_idx + 2] = b3;
           update = true;
       }
       frame_idx += 3;
   }
   update
}
}
And the game loop becomes:
fn main() {
// ...init sdl
// ...load program

   let mut screen_state = [0 as u8; 32 * 3 * 32];
   let mut rng = rand::thread_rng();

   cpu.run_with_callback(move |cpu| {
       handle_user_input(cpu, &mut event_pump);
       cpu.mem_write(0xfe, rng.gen_range(1, 16));

       if read_screen_state(cpu, &mut screen_state) {
           texture.update(None, &screen_state, 32 * 3).unwrap();
           canvas.copy(&texture, None, None).unwrap();
           canvas.present();
       }

       std::thread::sleep(std::time::Duration::new(0, 70_000));
   });
}
The last sleep statement was added to slow things down so that the game runs at a playable pace.
And there you have it, the first game running on our emulator.
The full source code for this chapter: GitHub